E3 - How to configure an Account SSO (Azure)
E3 - How to configure an Account SSO (Azure)
Azure Panel
- Login to your Azure account
- Open the Microsoft Entra ID service
- In the left sidebar, click on Enterprise application
- Click on Create a New application
- Then Create your own application
- Fill the What's the name of your app?
(suggest using E3 APP) - In the What are you looking to do with your application?, select the last one Integrate any other application you don't find in the gallery (Non-gallery)
- In the left sidebar, click on Single sign-on
- Then click on SAML
- Click on Edit in the Basic SAML Configuration card
- In the Identifier (Entity ID), use your domain + your app name
(example: https://yourdomain.com/e3-app) - Reply URL (Assertion Consumer Service URL) put: https://admin.e3.software/api/auth/sso/login
- Click on Save and close the modal
- Click on Edit in the Attributes & Claims card
- Delete all existing Additional claims (clicking on the “…” at the end of each table row)
- Add new claims
|
Name |
Namespace |
Source |
Source Attribute |
|---|---|---|---|
|
|
Leave empty |
Attribute |
user.userprincipalname |
|
enabled |
Leave empty |
Attribute |
user.accountenabled |
|
firstname |
Leave empty |
Attribute |
user.givenname |
|
lastname |
Leave empty |
Attribute |
user.surname |
|
fullname |
Leave empty |
Attribute |
user.displayname |
|
phone |
Leave empty |
Attribute |
user.mobilephone |
Go back to the Single Sign-On page (don't close this page opened, we will need to copy some data in the next steps)
E3 Admin
- Go to Accounts
- Create or edit your if already have one
- Go to the Integration(s) tab
- Click on the Settings in the Single Sign-On (SSO) card
- Active Enable and Show toggles

- In the Single Sign-On page, Basic SAML Configuration card
- Copy the Identifier (Entity ID)
- Past in the Account -> SAML Issuer
- In the Single Sign-On page, SAML Certificates card, Download the Certificate (Base64)
- Edit the file and copy the content (should start with -----BEGIN CERTIFICATE-----)
- Past the content in the Account -> SAML Verification Certificate
- In the Single Sign-On page, Set up E3 APP card
- Copy the Login URL
- Past in the Account -> SAML Login URL
- In the Single Sign-On page, search in the sidebar and open the Overview
- Copy the Application ID
- Past in the Account -> SAML Application ID
- In the Account page, click on Save
Mapping Default Roles
- In the settings modal of Single Sign-On page, activate the Emergent 3 Only toggle, and click in mapping
- All account groups will be listed.
- You can fill a new identity to your groups. It can be used to set groups to a user in the e3groups attribute
- Choose the default role that new users will receive on login
- Click on Save
Azure Users
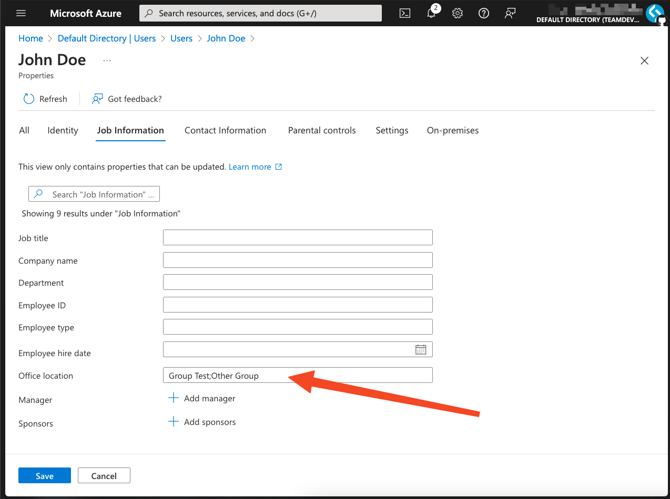
When configuring your Microsoft users, you will use the source attribute of e3groups (office location in the example case) to set e3 groups to this user.
The attribute can have one group or multiple groups. If the field has multiple groups, the delimiter to make that possible will be ; (semicolon).
You can use the group name or the identity (set up on the mapping).

The user will be assigned to a default role set up using the mapping feature; if the group is a child group and does not have a default role, then the role will default to the parent group’s default role.
John will be added to the "Group Test” and “Other Group” groups with the default roles set up in the mapping step.
If there is no default role in the parent group or in the group, then the user will be added to the group without any role.
SSO users only will be auto-added to groups in the first login, if you need to add more groups to an existing user, you can do it directly in the User(s) tab on the group's page.
Note: Active users will sync at midnight to their associated group(s).
Users that are manually added to groups will maintain those changes, the sync will not override manual additions/invitations.
Deactivated users will be removed from ALL groups, including manually added groups.
Need more help?
💬 Chat with us.
Click the chat icon in the bottom-right corner of this page to connect with our team instantly.
✉️ Email us.
You can also send us an email at help@emergent3.com.