A detailed look into the commonly-faced problems and how they can be addressed
Do Not Disturb Configuration
If you have enabled Do Not Disturb (DND) on your Android phone, the system blocks all notifications and calls to deliver a distraction-free environment. However, Android allows E3 to bypass the Do Not Disturb mode.
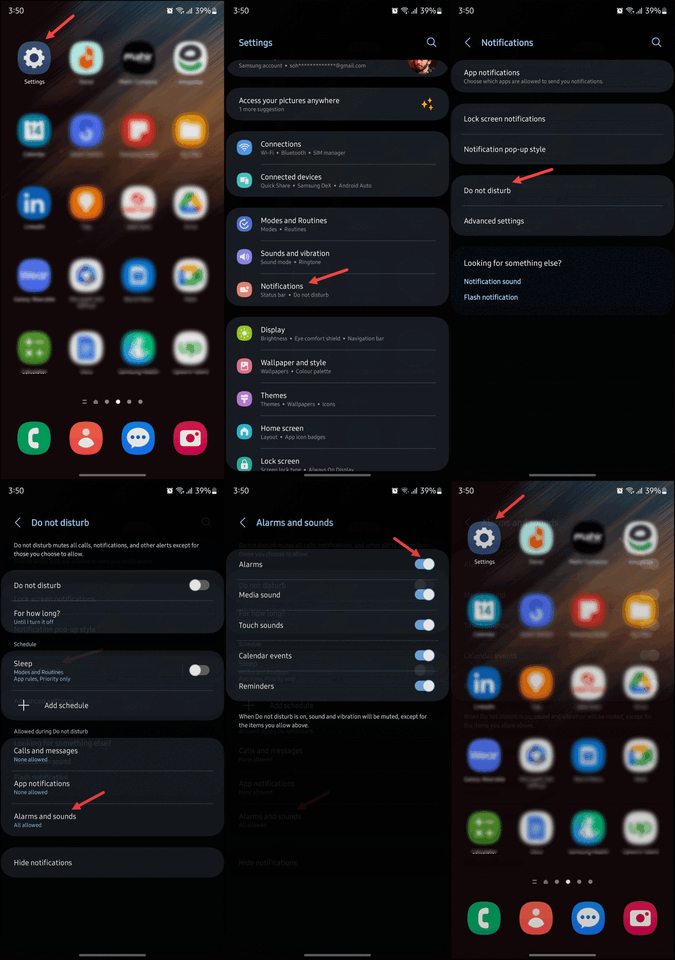
1. From your Android phone screen, tap the Settings icon to access settings.
2. Once in the Settings screen, tap the Notifications tile. This takes you to the Notifications screen.
3. From here, tap Do not Disturb. This reveals all settings associated with Do Not Disturb.
4. Go to the section labeled "Allowed during Do Not Disturb" and select "Alarms and Sounds".
5. From the Alarms and Sounds screen, make sure that the Alarms toggle is turned on.
6. From the Do not Disturb screen, tap the "App Notifications" button
7. This opens the App Notifications screen. Here, tap the "Add Apps" button. This reveals all apps installed in your phone.
8. Select E3 and tap the "Done" button.
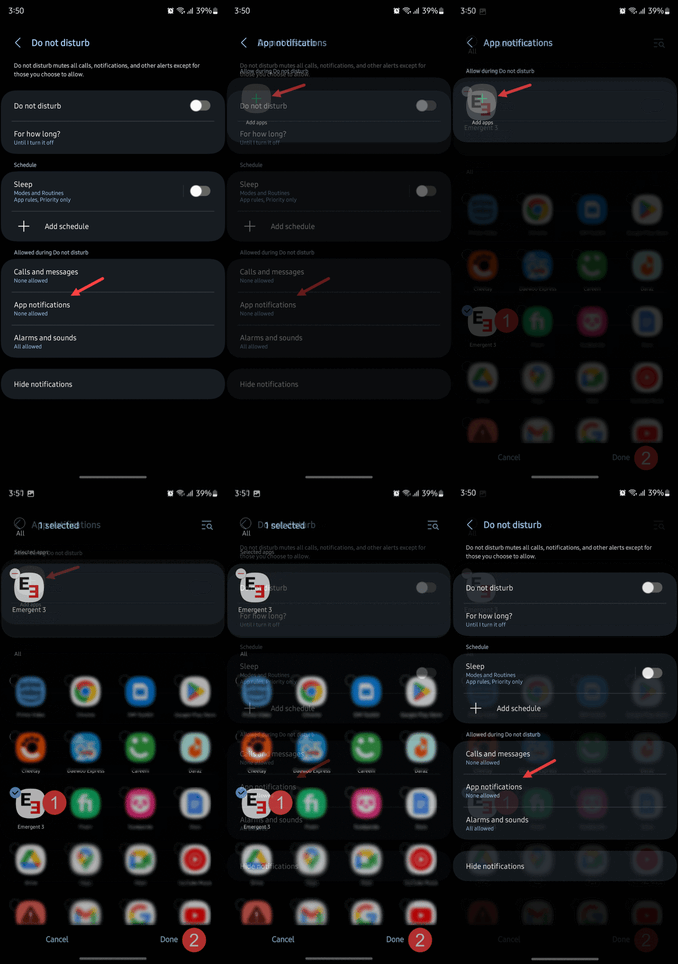
From now on, you will continue to receive notifications from E3 even in active DND mode.
Note: Settings navigation and terminology can vary within different versions of Android and/or device manufacturers.
Check the Volume and Sound Settings
Check the volume settings on your phone. The "Ringtone" volume level and "Sound Mode" must be on.
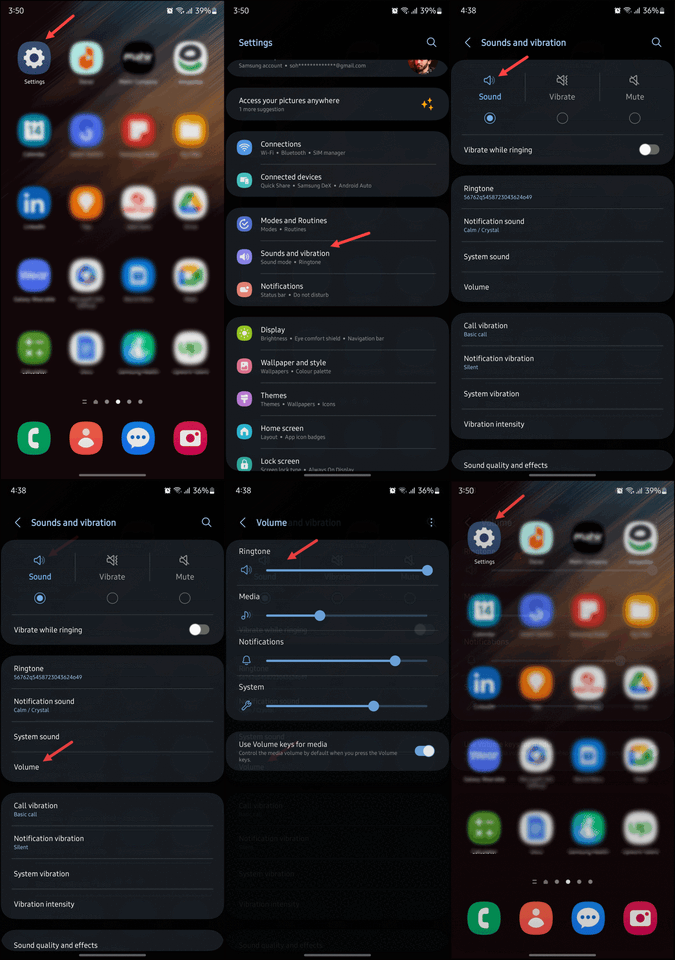
1. From your Android phone screen, tap the Settings icon to access phone settings.
2. Scroll down and tap the "Sounds and Vibration" tile.
3. From the Sounds and Vibration screen, make sure the Sound mode is selected.
4. After that, scroll down and tap the "Volume" button.
5. Turn on Ringtone. This can also be done from the side volume button settings.
Check the Notification Settings
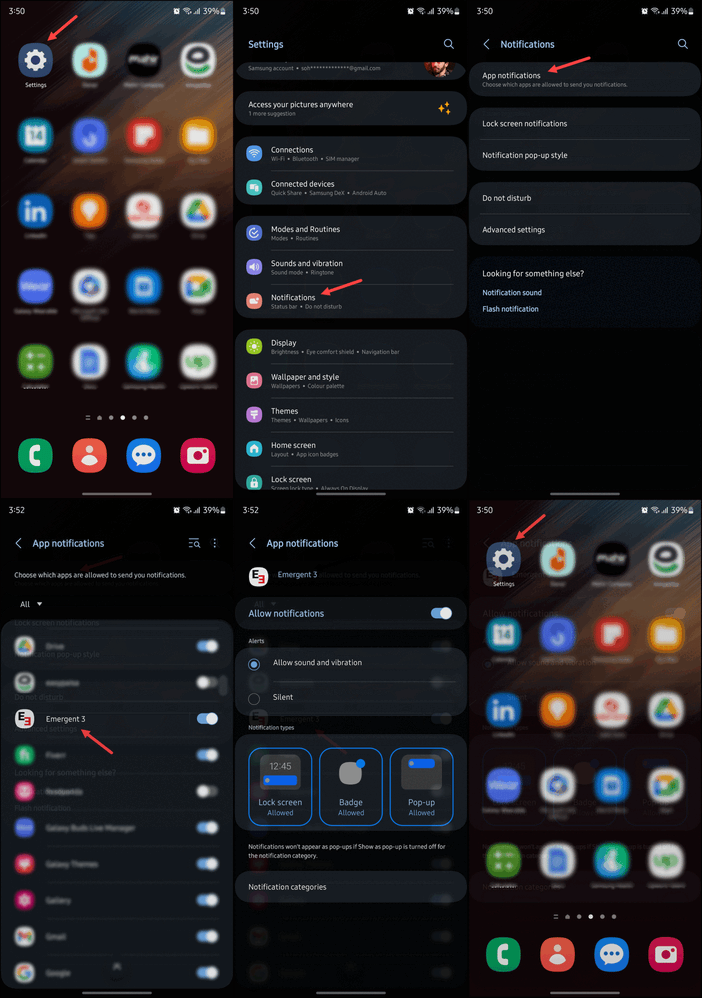
1. From your Android phone screen, tap the Settings button.
2. From the Settings screen, tap Notifications
3. Once you arrive at the Notifications screen, simply tap on App Notifications.
4. From the App notifications screen, tap Emergent 3.
5. Make sure that all notifications are allowed for the E3 app.
Enable Visual Notifications (Optional)
Android allows some devices to flash the camera light or the screen when you receive notifications or when alarms sound. This can be configured to E3 notifications and alarms.
1. From the phone screen, tap the Settings button.2. Once on the settings screen, scroll down and tap the Accessibility button.
3. Tap on the Advanced Settings option from the screen that appears.
4. From the Advanced Settings screen, enable the Camera Flash Notifications toggle.
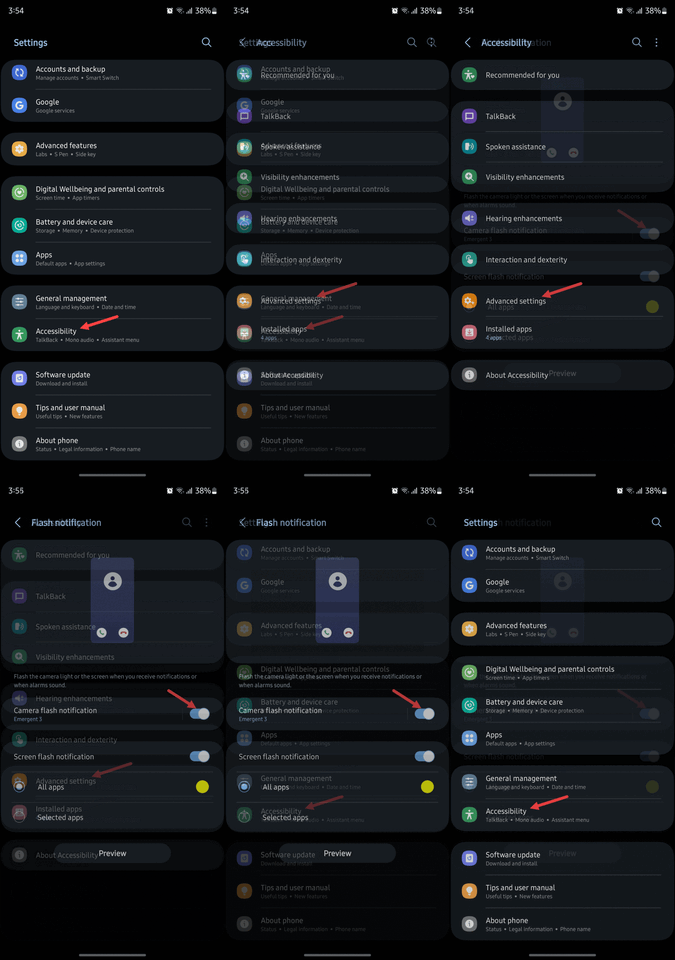
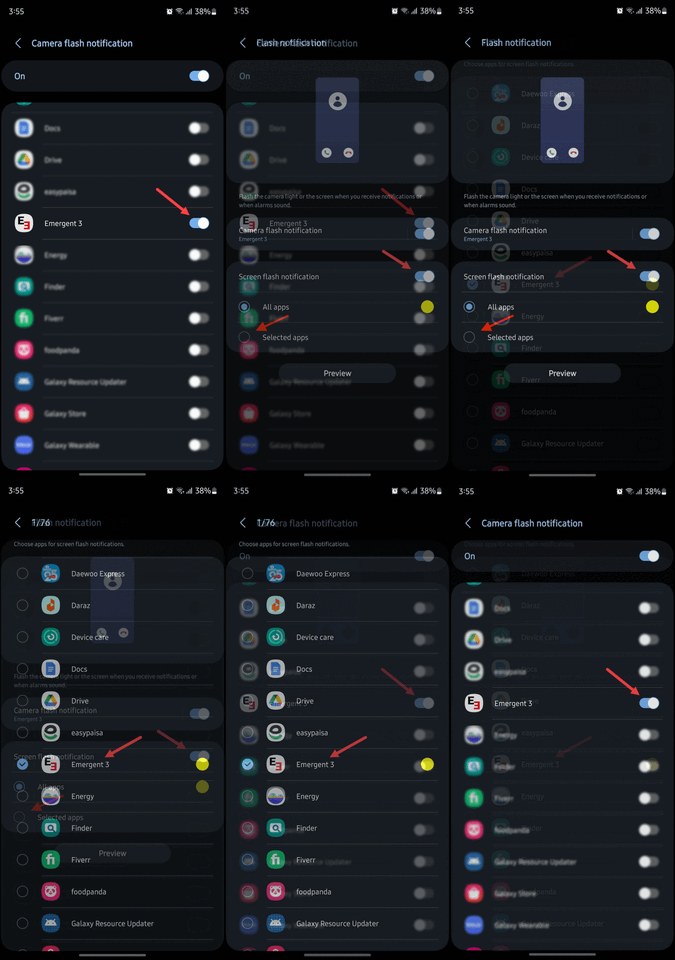
6. Similarly, enable the Screen Flash Notifications toggle.
7. Once enabled, tap the Selected apps radio button. This takes you to the app selections screen.
8. Here, mark the checkbox for Emergent 3.
Notifications Settings on the Lock Screen
If notifications don't appear on your Android phone's lock screen, follow the steps below to make changes:
1. Once on the Settings screen, tap the Notifications button.2. As the Notifications screen opens, tap the Lock Screen Notifications button.
3. Make sure that Alarm and Silent Notifications is selected under the Notifications to Show button.
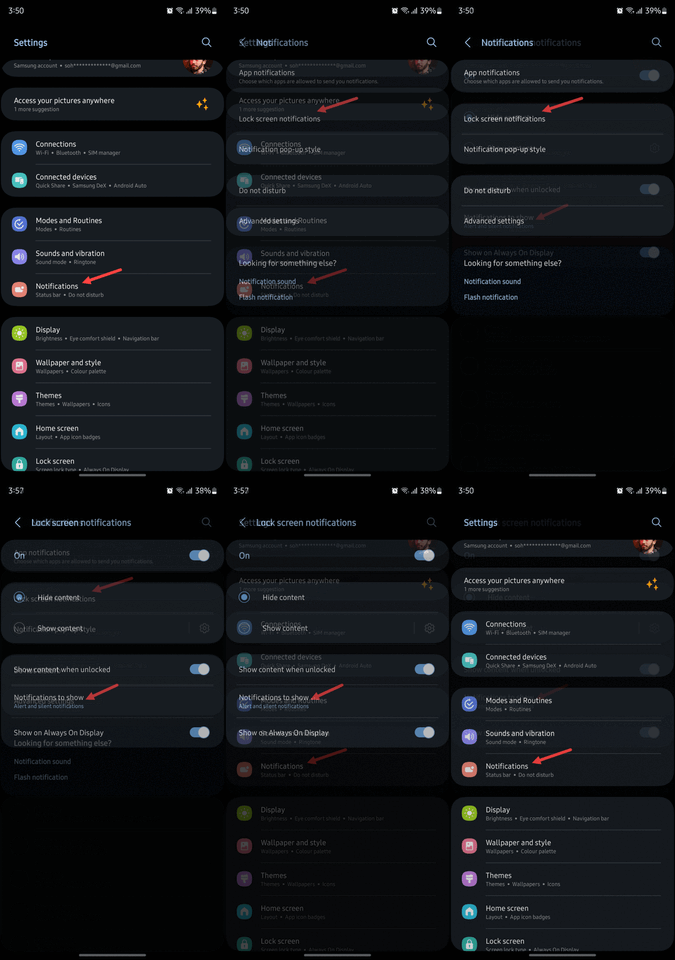
You'll now receive notifications on your Android phone's lock screen.
Disable Battery Saver and Adaptive Battery Modes
An active Battery Saver mode on your Android phone delays notifications, disables location services, and turns off background activities. Either it's time to give it a charge or disable the Battery Saver mode.
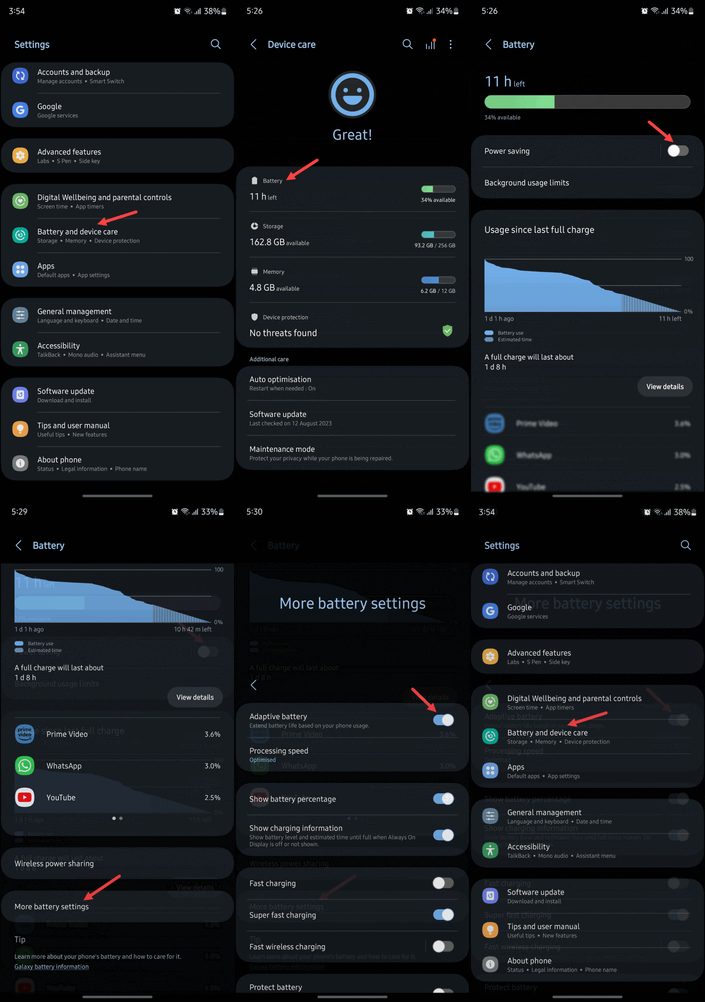
1. Launch the Settings app from your Android phone and tap the Battery and Device Care button.
2. From the screen that follows, tap the Battery button.
3. From the Battery screen, make sure that the Power Saving toggle is disabled.
4. Scroll down to the end of the Battery screen and tap the More battery settings button.
5. From the screen that follows, make sure that the Adaptive Battery toggle is disabled.
Lock essential apps in the background
Android OEMs (the companies that make the phone) like Samsung, Xiaomi, Oppo, OnePlus, and Vivo implement an aggressive battery-saving mode to kill inactive apps in the background. You can lock essential apps like E3 in the multitasking menu to continue receiving notifications without any issues.
1. Swipe up and hold from the bottom to open the recent apps menu.2. Long tap the E3 icon and tap the E3 icon again and select Keep open or Lock this app.
The system makes an exception for locked apps and won't completely kill E3 from running in the background.
Check background data settings for affected apps
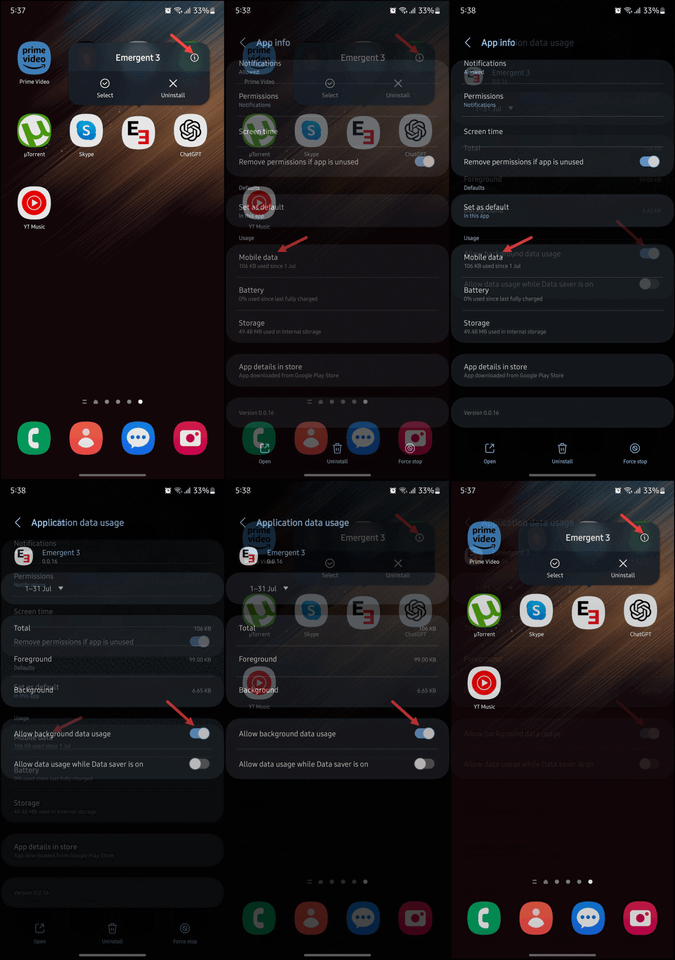
If you disabled background data permission for E3, notifications won't work until you open the app.
1. Long tap the E3 app icon and tap the i icon to open the app info menu.
2. From the screen that opens, tap Mobile data displayed under Usage.
3. Enable the Background Data Usage toggle.
Update E3 to the latest version in the Play store
We frequently release app updates to add new features and fix bugs. Notifications may not work on your Android phone due to an outdated app build. Head to the Google Play Store and install pending app updates or better yet, enable auto-updates.
1. Open the Google Play Store on your Android phone.
2. Search "E3 Safety".
3. Select Update. In case the app is up to date, the Update button is replaced by Open.
Enable auto-updates for E3
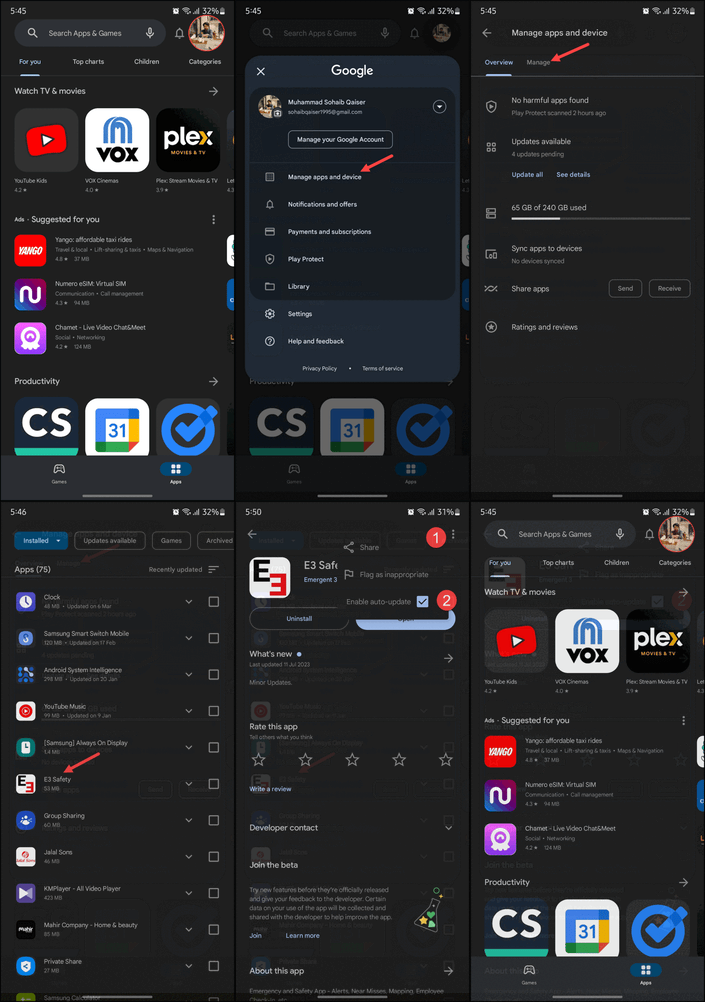
We frequently release app updates to add new features and fix bugs. Notifications may not work on your Android phone due to an outdated app build. Head to the Google Play Store and install pending app updates or better yet, enable auto-updates.
1. Open the Google Play Store on your Android phone.
2. At the top right, tap the profile icon.
3. Tap Manage apps & device.
4. Tap Manage, then find E3.
5. Tap E3 to open the "Details" page.
6. On the app's "Details" page, tap the three-dot icon at the top-right corner of the screen
7. From the menu revealed, make sure that the enable auto-update checkbox is marked.
Update Android OS
Download and install the latest version of Android.
1. Open the Settings app from your Android phone.2. Tap the Software Update button.
3. Download and install the latest Android build on your phone.
