Jump to Section
Creating a New Alert
Step 1:
Go to your Workspace Dashboard > Manage > Alert Types.

Step 2:
Click + New Alert Type.

Step 3:
Upload the Alert's icon.

Step 4:
Enter the alert's name and description.

Step 5:
Choose the default Sound option. The user can still modify this before they send the alert.

If the user sends the alert with Silent by Default checked, the alert will be sent silently. This means the alert will still notify everyone's device, BUT there will be NO AUDIBLE SOUND.
Step 6:
Customize your Alert Tones.

Instead of using the default horn sound, you can choose from available tones listed in the drop down.
Use the Preview function to listen to your selected tone before confirming
After selecting your preferred tone, you can customize how many times it repeats. This helps ensure the alert is noticed while avoiding excessive noise.

Changes apply system-wide. This means all users in your organization will hear the new tone for that specific alert type.
Step 7:
Choose the default Visibility option. The user can still modify this before they send the alert.

If the user sends the alert as Internal, the alert will be sent to all members of the selected group whereas External will send the alert to both internal and external (local police).
Step 8:
Under Scoped Roles, you can limit the roles by marking which roles the alert will be sent to.

Visit the article below to find more information about scoped roles:
Scoped Alerts: Send alerts to only a specified group of users
Step 9:
Toggle on or off Approval Required checkbox.

Alerts with Requires Approval checked will require an admin's approval before it is sent to users. For more information, visit the article below:
Step 10:
Toggle on or off Enable Roll Call checkbox.

Alerts with Roll Call Enabled supports take roll.
Click Save & Exit to save your new alert.
Editing an Alert
Step 1:
Go to Workspace Settings → Alert Types, then select Edit next to the alert you want to update.

Step 2:
Make the changes and click Save to save your edits.

Deleting an Alert
Step 1:
Go to Workspace Settings → Alert Types, then select Delete next to the alert you want to remove.

Step 2:
Click Confirm on the confirmation pop-up to delete the alert.

Reordering Alerts
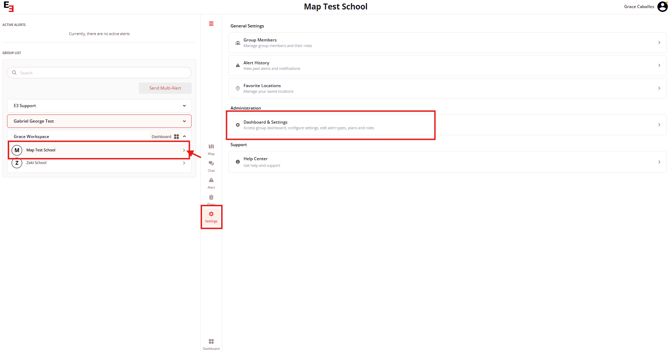
Step 1:
Go to Groups, select the group you want to make changes to, and click Settings. Under Administration, select Dashboard and Settings.
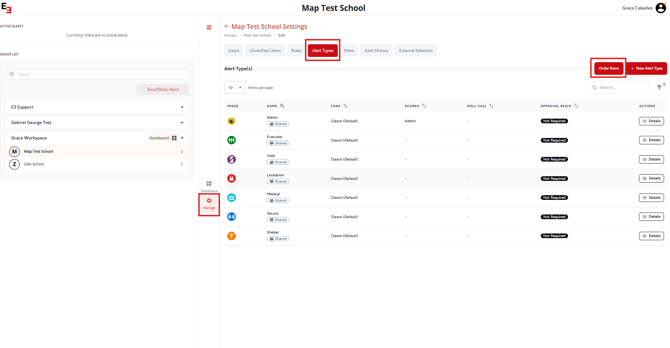
Step 2:
Go to Manage > Alert Types, then click Order Rows.
Step 3:
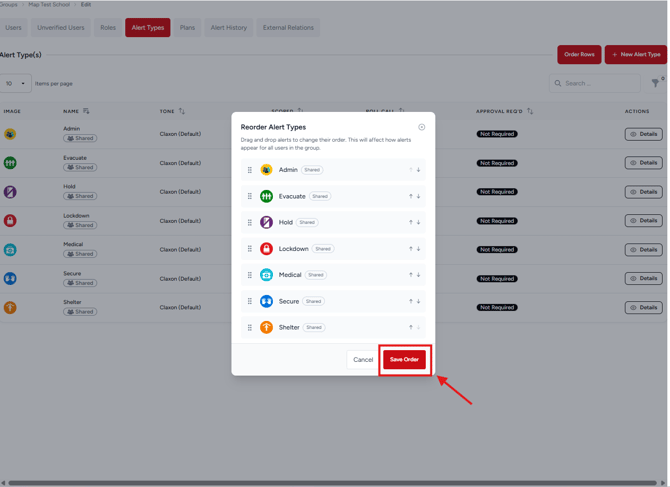
1. Drag and drop the alert types into your preferred order.
2. Once the rows are arranged correctly, click Save Order.
This will affect how alerts appear for all users in the group.
Need more help?
💬 Chat with us.
Click the chat icon in the bottom-right corner of this page to connect with our team instantly.
✉️ Email us.
You can also send us an email at help@emergent3.com.